Kulinary Adventures of Kath

Food Photography, Recipes & Baking
  • home
  • About
  • Work with Kath
  • Shop
  • Blog
    • The Blog
    • Recipe Archive
  • Newsletter
  • Contact
  • home
  • About
  • Work with Kath
  • Shop
    • The Blog
    • Recipe Archive
  • Newsletter
  • Contact
Raspberry Pistachio Rose Cake (23 of 25).jpg

The Blog

Recipes and Food Photography by Kath Vincent.

  • The Blog
  • Recipe Archive
  • All
  • Biscuits/Cookies
  • Breads Etc.
  • Breakfast
  • Cakes & Slices
  • Confectionary
  • Drinks
  • Events
  • Food Photography Tips
  • From The Mailing List
  • Heirloom Recipes
  • Holidays
  • Ice Cream
  • Jams Preserves & Spreads
  • Muffins
  • Off the Shelf
  • Other Desserts
  • Savoury Dishes/Meals
  • Scones
  • Tarts & Pastry
  • Travel
My Ultimate Cheese Board

My Ultimate Cheese Board

How to Create the Ultimate Cheese Platter

Kath March 21, 2016

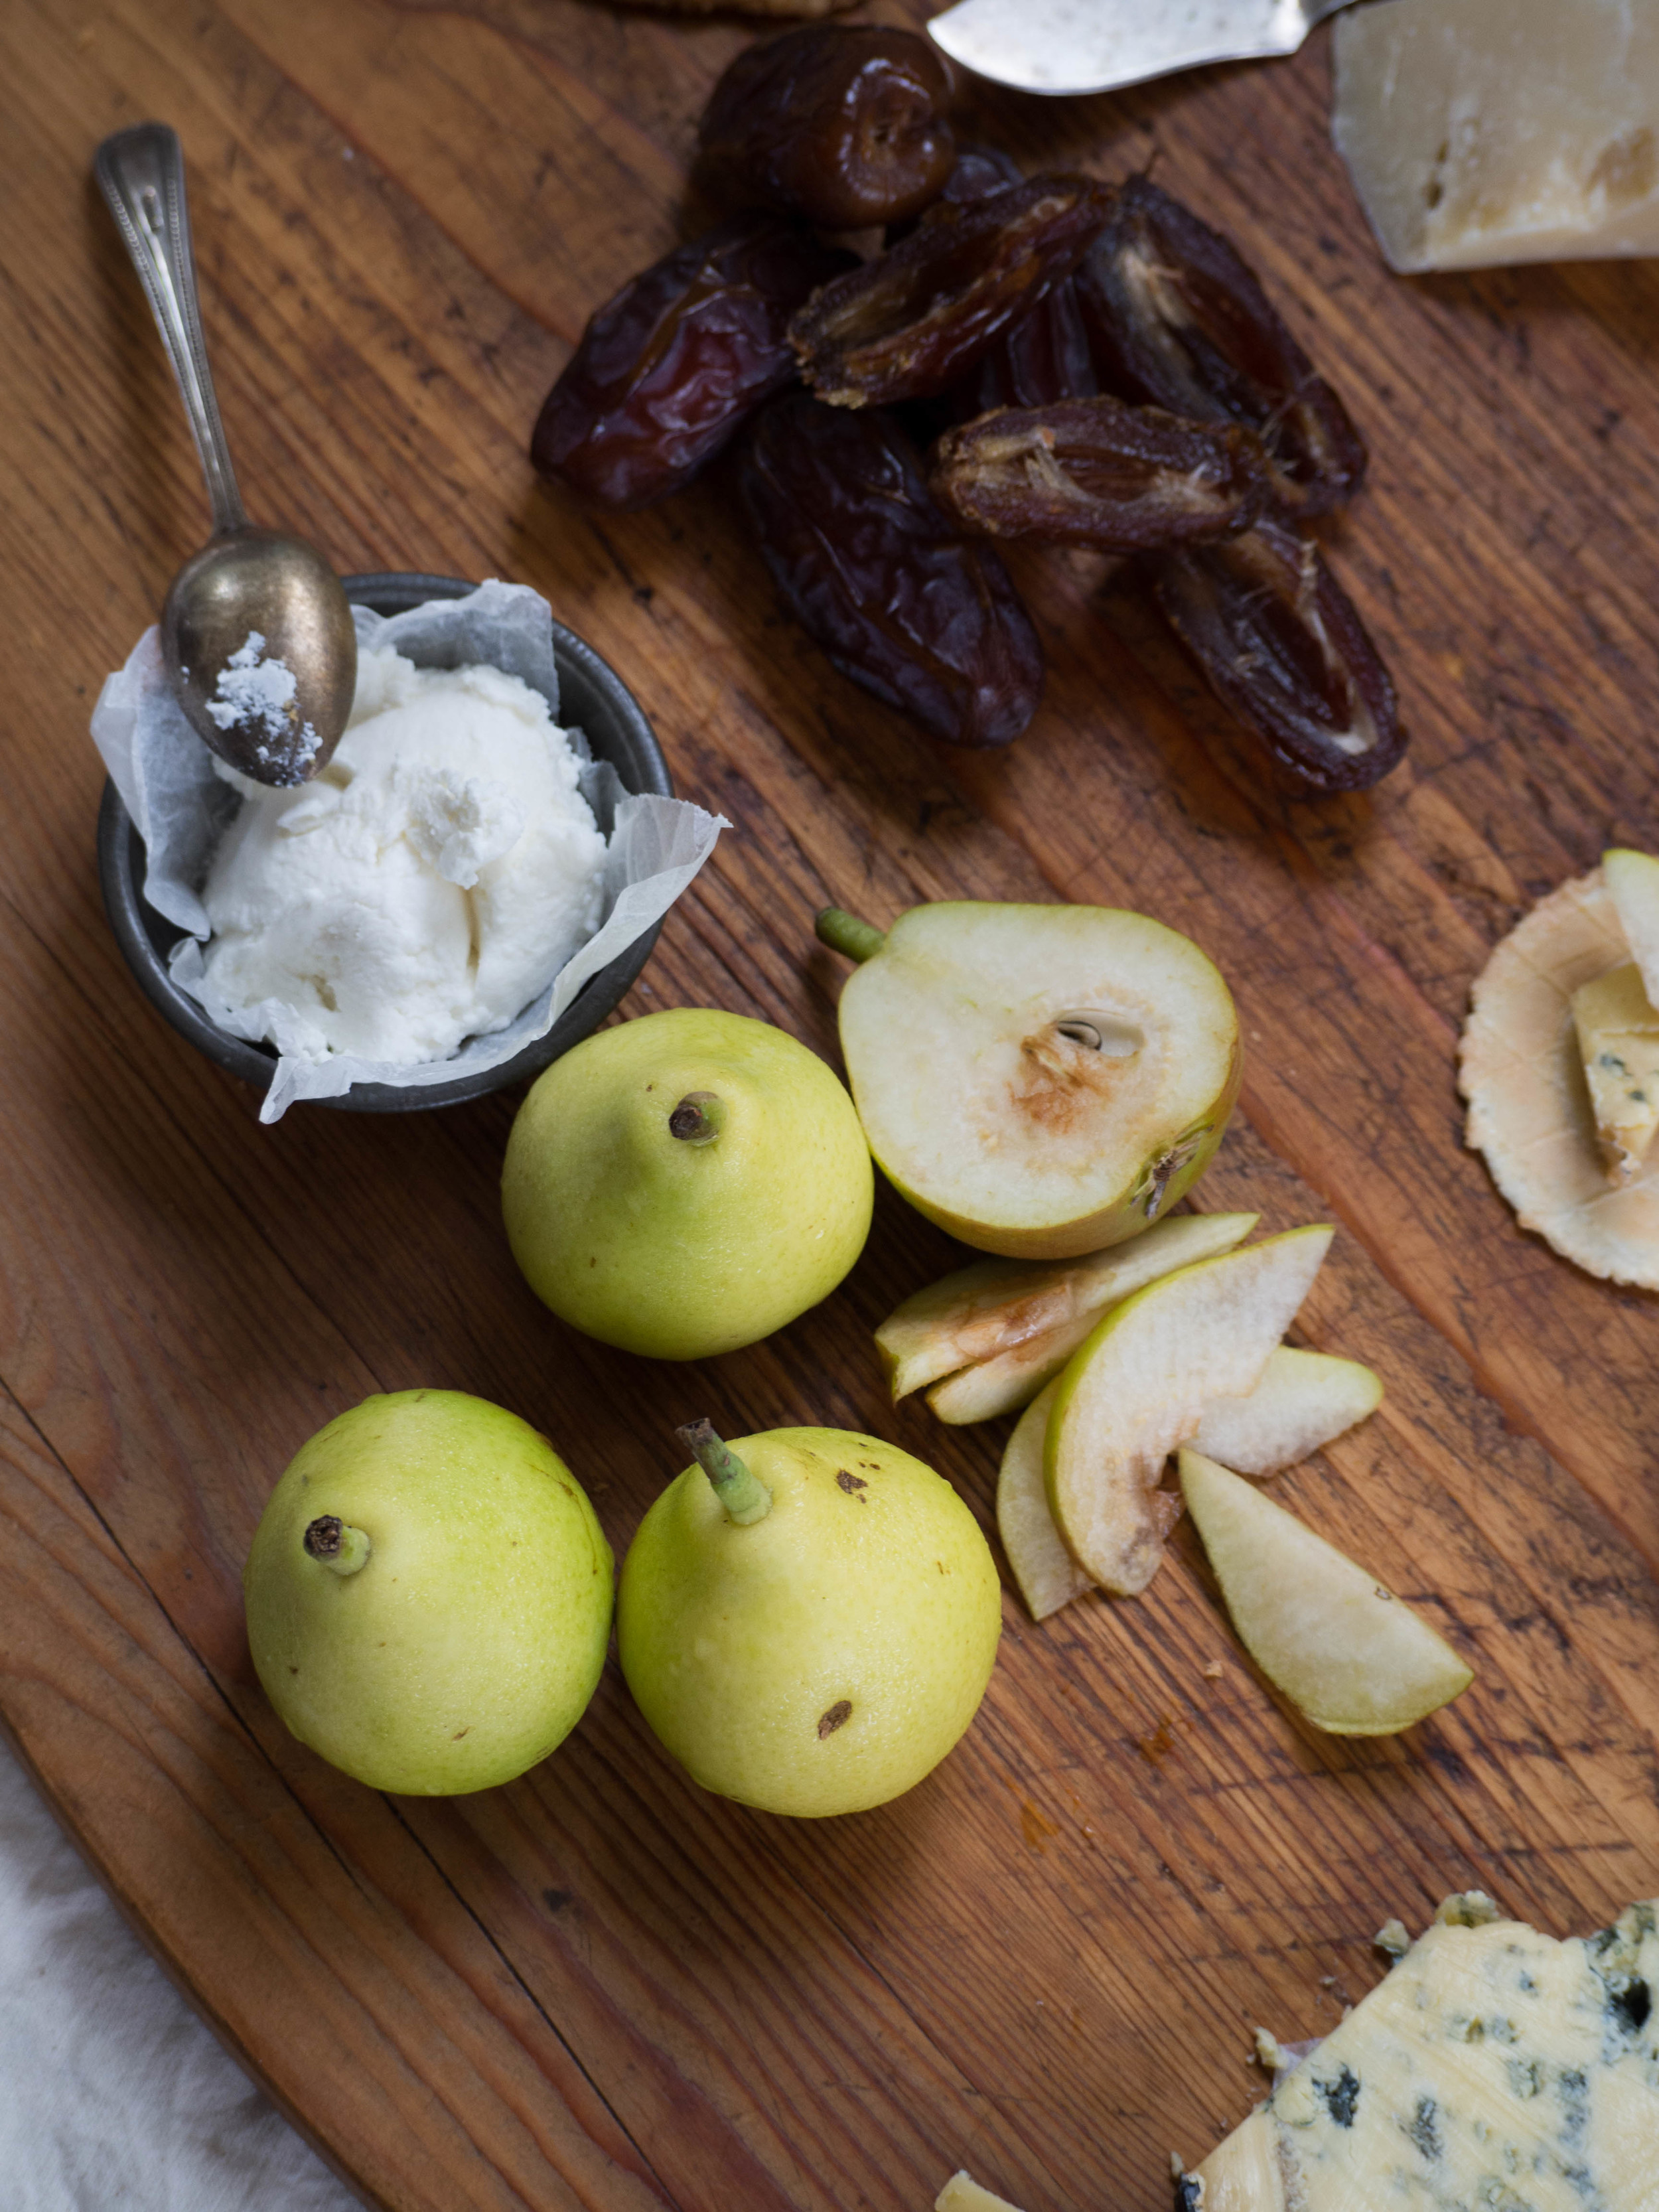
This is my idea of the best cheese platter. Whilst still very much a savoury affair, there are definite sweet notes that keep me and my sweet tooth very happy. You don’t have to make your own biscuits, though these Quinoa Flake Biscuits taste one hundred times better than they sound (just ignore the fact they have quinoa in them!). You must, however, include the sweet pickled strawberries. They are the nicest way I have ever eaten strawberries and go so well with the goats curd in particular that I think they end up being the hero of the whole platter.

The real honeycomb is also a real winner here, and this cheese platter has finally given me an opportunity to utilise it. I have searched for recipes that incorporate honeycomb, only to find cakes or sweets that are based on the lolly made using sugar and bicarb soda. 

I read online during my search for recipes that used honeycomb that some people don’t like the texture of it. Maybe it’s the fact it tastes like honey but has a softly crunchy and chewy texture that throws people off, as if they are expecting to eat honey, the crunchy texture may seem strange. I had no problem with the texture and accompanied with some soft goats curd and the pickled strawberries and the crunch of the biscuits, added a welcome sweetness and chewy-ness. I would suggest buying a plain honeycomb, not a eucalyptus or lavender (etc) variety as any other flavours would overpower the rest of the cheese platter. 

I have left off quantities for the actual cheese platter, as it depends how many people you want to feed. The quinoa flake biscuits last at least a week in an air tight container and the pickled strawberries last one week in the fridge, so they don’t all have to be consumed right away. I found we nibbled all week on the biscuits, goats curd, honeycomb and strawberries in particular, once we were home from work (and ruined our dinner appetites every time!), and were quite disappointed when we had eaten it all. This cheese platter would be a nice thing to bring out over the upcoming Easter long weekend to enjoy with guests, or just for a quiet evening to yourselves. 

To Create My Ultimate Cheese Platter You Will Need: 

Mejool dates, pits removed 

Pears (I used the small paradise pears as they were in season)

Honeycomb

Goats curd (goats cheese would work well too)

A nice blue cheese

A hard cheese such as parmesan or a nice aged cheddar 

Quinoa flake biscuits 

Shop bought wafer biscuits (or any other flavourless biscuit)

Pickled strawberries


Serve with drinks, as an casual entree or even as an after dinner cheese course (in place of dessert). 


Quinoa Flake Biscuits

Ingredients: 

50g butter

125g quinoa flakes (found in the health food/gluten free section of the supermarket)

2 eggs, lightly beaten

250g caster sugar

2 tbsp plain flour 

2 tsp baking powder

zest of one small/medium (or half a large) orange 


Method: 

Pre heat oven to 180 degrees Celsius, and line three baking trays with baking paper. 

Melt the butter, then mix in with the quinoa flakes, sugar and eggs. Sift in the remaining dry ingredients and orange zest and mix until combined. 

Using a teaspoon, place small balls of the mixture on to the trays, ensuring there is enough room for them to spread, because they will! I found I could have made mine even smaller after they spread so much in the oven! 

Bake for 10-12 minutes, or until biscuits are golden. Remove from the oven and leave to cool on the trays or on wire racks. 

Pickled Strawberries

Pickled Strawberries

Pickled Strawberries

Ingredients: 

500g strawberries 

185ml verjuice (Maggie Beer has a good verjuice in her range of products, many independent grocers and delis sell it) 

100g caster sugar 

115ml water  

1 vanilla bean

1tsp pink peppercorns

rind of one small/medium (or half a large) orange, peeled in larger chunks 


Method: 

Put the verjuice, sugar, water, orange rind and pink peppercorns into a small saucepan. Split the vanilla bean and add to the saucepan. Place on medium-high heat and bring to the boil. Stir occasionally to ensure the sugar dissolves. 

Set verjuice mixture aside for 10 minutes or so to cool a little.

Hull and halve the strawberries (quarter if they are particularly big) and place into a large jar (about 1l capacity) or two smaller jars (about 500ml each, I used two 1 pint (around 470ml) Ball Mason jars). 

Pour over the verjuice mixture and store pickled strawberries in the fridge. 

References: Sophie Hansen of ‘Local is Lovely’ - http://local-lovely.com/sweet-pickles-the-whey-to-go/

In Savoury Dishes/Meals Tags cheese platter, cheese, fresh honeycomb, honeycomb, pickled strawberries, quinoa, quinoa flake biscuits, Long Weekend
Comment

Shallow Fried Zucchini Flowers & Slow Roasted Tomato Sauce

Kath July 23, 2015

These two recipes to me, scream Winter comfort food. I have made the Slow Roasted Tomato Sauce numerous times recently. The original recipe, from the Monday Morning Cooking Club’s second book ‘The Feast Goes On’, says the sauce is enough to feed six. I find when mixed with cooked pasta (any kind will do!), I can feed three or four for dinner then still have enough leftovers for three lunches. This kind of cooking makes the organised side of me very happy. Good dinner? Check! Lunch for work sorted? Check! 

When I made this pasta dish over the June long weekend, I was secretly patting myself on the back. Not only was I going to be able to feed five people at home that weekend, I might even have some leftovers for lunch the next day. Winning, right?! 

I forgot however, to take into account that my brother, who was staying that weekend, eats enough food for like two people per meal. So, no leftovers for me. And even if there were some, the likelihood of them being eaten by said brother for breakfast (yes, breakfast) the next morning would have been quite high. 

If you do make the sauce and happen to have leftovers, it will keep in an airtight container in the fridge for a few days. 

These two recipes served in the same evening, make for a great Italian style feast. I would cook the tomato sauce before, make and serve the zucchini flowers as they were ready then, cook some pasta, warm up the sauce and serve that as the main for the meal. 

A note on the zucchini flowers: The recipe for the batter can easily be doubled if you are cooking more. The zucchini flowers should be served immediately after cooking, as they are not quite the same when re-heated. 

Shallow Fried Zucchini Flowers

Ingredients: 

8 zucchini flowers 

1 ball buffalo mozzarella 

Handful basil leaves, shredded

¼ cup grana padano (or parmesan) cheese, grated 

Ingredients for the Batter: 

100g self raising flour

¾ cup ice cold water

Pinch of salt 

Vegetable oil, for frying 


Method: 

Wash and dry zucchini flowers, ensuring the insides of the flowers are free from any residual dirt and the stamens have been removed. 

Mix the basil and grated cheese together. Tear pieces off the buffalo mozzarella and use to stuff the flowers. Add some of the basil and grated cheese and twist the top of the flowers to seal. 

Prepare the batter only just before it is needed. 

To prepare the batter, gently whisk all the ingredients together with a fork (the mixture will be lumpy). 

Heat a shallow fry pan with some vegetable oil on medium-high heat. Coat the flowers in the batter, then place one at a time (or three or so at a time if using a larger pan), and allow to cook for 1 minute or so on each side. Ensure all of the batter has cooked. 

Place on paper towel to drain any excess oil after cooking, and serve immediately. 

Recipe Adapted from ‘Maggie’s Harvest’ by Maggie Beer (Penguin Group, 2007), pp. 182-3. 

Pasta Sauce, Pasta & Zucchini Flowers (5 of 23).jpg

Slow Roasted Tomato Sauce

2kg very ripe tomatoes 

x 2 large red onions

x 2 cloves garlic

200g dried black olives 

¼ cup capers, drained 

8 anchovy fillets, chopped 

Olive oil 

3 tbsp tomato paste 

½ cup grated parmesan cheese 

1 bunch basil (leaves only), chopped 


Method: 

Pre heat oven to 200 degrees Celsius. Drizzle some olive oil between two large baking trays. Roughly slice the tomatoes (approximately 1 cm slices), and divide between the two trays. Slice the onion and place one onion in each tray. Divide the black olives, capers and anchovies between the two trays. Drizzle with more olive oil crush one garlic clove over each tray, then toss all the ingredients to coat. 

Reduce the oven to 170 degrees Celsius and place both baking trays in the oven. Cook for 1 ½ to 2 hours, stirring every 30 minutes. Cook until the tomatoes and onions have softened and reduced, and there is still some liquid left in the trays. 

Remove from oven and combine the two trays into one. Stir through the tomato paste, parmesan and basil. 

Serve with freshly cooked pasta, topped with a little extra basil and grated parmesan. 

Reference: ‘The Monday Morning Cooking Club: The Feast Goes On’ by Lisa Goldberg, Merelyn Frank Chalmers, Natanya Eskin, Lauren Fink, Paula Horwitz & Jacqui Israel (HarperCollins Publishers, 2014), p.74.

In Savoury Dishes/Meals Tags Zucchini Flowers, Tomato Sauce, Pasta, Italian Feast, Dinner, Winter, cookbook challenge, Monday Morning Cooking Club, Maggie Beer
1 Comment

Donna Hay’s Harissa Chicken with Gremolata

Kath June 12, 2015

Now that the weather seems to have truly turned to Winter, warming and comforting dishes are in high demand. This recipe for Harissa Chicken by Donna Hay, fits the bill perfectly. The spiciness of the harissa warms you to your bones, while the gremolata subtly cools the kick and adds a wonderful depth of flavour to the dish. 

This dish is also quite easy to make, which is always a winner when you want warmth with minimal effort. 

The original recipe stipulates the use of mixed olives, but since my obsession with dried black olives remains unwavering, I used those. Either work well, just use whatever you like or can easily come by. 

Harissa Chicken (5 of 23).jpg

Ingredients: 

8 x 220g chicken thigh fillets, bone in and trimmed

8 cloves garlic, unpeeled

1 cup mixed or dried olives

1/4 cup tomato paste

1 tbsp harissa paste 

1 tbsp brown sugar

1/2 cup chicken stock 

sea salt and black pepper

400g truss Roma tomatoes (still on vine if possible) 


Ingredients for Gremolata 

1/2 cup flat-leaf parsley leaves, chopped

1/2 cup coriander leaves, chopped

1 tbsp lemon juice

1 tbsp shredded lemon zest 

2 garlic cloves, crushed 


Method: 

Pre-heat the oven to 180 degrees Celsius. Place the chicken, garlic, olives, tomato paste, harissa paste, sugar and chicken stock in a large baking dish, trying to evenly distribute the tomato and harissa pastes amongst the chicken. Sprinkle with salt and pepper. Cover with aluminium foil and roast for 1 hour. 

Whilst the chicken is in the oven, make the gremolata by combining the all the gremolata ingredients in a small bowl. Set aside. 

After the chicken has been roasting in the oven for 1 hour, increase the temperature to 200 degrees Celsius and remove the foil. Add the tomatoes to the baking dish and cook for a further half an hour, or until the chicken is completely cooked through.

Serve with the gremolata. 

Original recipe from ‘The New Classics’ by Donna Hay (Fourth Estate an imprint of HarperCollins Publishers, 2013), p. 145.

In Savoury Dishes/Meals Tags Harissa Chicken, Chicken, Donna Hay, Winter, cookbook challenge
2 Comments

Nigella Lawson's Italian Roast Chicken

Kath April 13, 2015

I’ve never been much of a roast chicken fan. Really, I’m not a fan of meat in general. Which is why over this cookbook challenge, when it comes to savoury options, there will be few red meat dishes (possibly none), and lots of chicken dishes. Now that I’ve said that, most of you will probably stop reading, because I’ve just told you I don’t eat almost a whole food group! 

Never fear, baking will remain the focus of this blog, so there will always be a satisfying sweet recipe around the corner. I am however, trying to add a few more savoury recipes to the blog whilst I am doing my cookbook challenge. Not only does it help out with deciding what to make for dinner on the weekend, but some cookbooks in our collection don’t have sweet or baking sections and some just don’t appeal to me. So with using ALL the cookbooks in mind, sometimes a savoury dish here and there will have to be tolerated. 

Having said that, if anyone could brighten up dinner and change my mind about roast chicken it’s Nigella. I know I’ve said this before (probably more than once), but I really love Nigella, her recipes and her love of food. I know in the past I have heard Nigella talking about how roast chicken is such a comforting dish, and up until I tried this recipe, I found it hard to agree. But now, I definitely do! 

This dish is one of those that you just know is going to be good. And once you’ve made it a couple of times, it suddenly becomes a family favourite, requested over and over again. My Mum made this recipe originally, in an attempt to actually have all members of the family eat the same thing for dinner I suspect. I was suspicious at first, but I was soon eating my words, and the chicken with gusto. 

For a while when this dish was first made, we couldn’t find the dried olives specified in the recipe. It was still a great dish, and if you haven’t tried it with the olives you won’t know what you’re missing out on. But, if you can find them, use them! They absolutely make this dish! We eventually found them at a local deli, so they are out there, and not too hard to find. 

As this recipe has been made a few times at home, we have inevitably altered it slightly. We use two small chickens, and divide the stuffing between each. One chicken of the same total weight will also be perfect. Orange capsicums can sometimes be hard to find, so substitute another yellow one to make up the difference. We often serve this chicken with garlic roast potatoes, which should be prepared and put in the oven about 30 minutes or so after the chicken goes in, so they are ready together. 

Ingredients: 

x 2 small chickens (approx. 1.5-2kg total weight), or one larger 1.5-2kg (approx.) chicken 

1 lemon, halved

4 sprigs of rosemary

3 leeks, washed and trimmed 

2 red capsicums 

1 orange capsicum 

1 yellow capsicum 

100-200g dried black olives*, (pitted if possible)

60 ml olive oil 

sea salt and pepper 


Method: 

Pre-heat oven to 200 degrees Celsius. 

Cut each leek into three (length ways), and add to a large baking/roasting pan. De-seed the capsicums, and cut into thick strips, and add to the pan.

Sit the chickens on top of the vegetables in the pan, and place half a lemon in each chicken cavity, and two sprigs of rosemary. If using one whole chicken, place both halves of the lemon, and all the rosemary in the cavity of the chicken. 

Drizzle the chickens and vegetables with the olive oil (ensuring the vegetables are fairly evenly coated), and scatter in the dried olives amongst the vegetables. Sprinkle the tops of the chickens with a little salt and pepper. 

Place in the oven for 1 - 1 1/4 hours, until the chicken is cooked through and the juices of the chicken run clear when the flesh is cut at the thickest part of the thigh joint. 

Transfer the chickens to a carving board or plates, cover with foil and allow to rest for 10 minutes. Place the vegetables back in the oven (reducing the oven temperature if they are well cooked), to keep warm. 

Remove the vegetables from the oven, and cut the chicken up into pieces. Toss the chicken with the vegetables in the pan and serve. 


*Nigella’s original recipe specifies 100g of olives. We often buy up to 200g as a few of us are obsessed with them! If you aren’t so keen on black olives, keep it to 100g.

P3080079.jpg

Original Recipe from ‘Nigellissima’ by Nigella Lawson (Chatto & Windus, 2012), p.96 or via Nigella's website.

All cooking, styling and photography for this post by Kathryn Vincent of Kulinary Adventures of Kath. 

In Savoury Dishes/Meals Tags Chicken, Nigella Lawson, Dinner, Italian
1 Comment

Chicken Sliders

Kath March 24, 2015

I have made these once before, a couple of years ago and they were great. At the time I couldn’t find mini brioche buns, so I used small bread rolls instead. This time as luck would have it, I walked into Woolworths to get some of the ingredients I needed for this recipe, and a whole rack of mini Brioche buns were right in the entry to the shop. Though I doubt that they are the best quality (particularly as on the front of the packet it said ‘Baked by us Today’, then on the back of the packed, in much smaller writing, ‘this product has been frozen from fresh and thawed for your convenience’ - hmmm …. *insert confused emoji face*), I was excited to finally make sliders actually using mini brioche buns for once. 

If you find normal brioche buns (the ones from Brasserie Bread are particularly good), make the patties bigger to suit. 

This recipe is full of flavour, and would make a great weekend dinner. The recipe is from the book ‘Home Cooking’ by Valli Little, a book which I can actually say I have used a few times since I got it! There are some great recipes in here, notably this one. There is also a Sticky Date Tart (p.168) which is a great alternative to a sticky date pudding in the colder months. 

Valli calls these sliders ‘Bombay Sliders’, probably because of the use of spices and mango chutney in them. They are a fiery alternative to a traditional burger (or slider), and are well worth a try. 

Ingredients for the Patties:

500g chicken mince

1/4 cup coriander leaves, chopped, plus extra to serve

1/3 spring onion, finely chopped

1 tsp ground cumin 

1 small red chilli, seeds removed and chopped

2 cm piece of ginger, grated

1/4 cup whole egg mayonnaise

1 1/2 tbsp mild curry powder


Ingredients for the Curry Mayonnaise: 

1/2 cup whole egg mayonnaise

2 tsp mild curry powder 

1 tbsp tomato sauce/ketchup

1 tbsp Greek-style yoghurt

1 garlic clove, crushed 


olive oil, for cooking

12 mini brioche buns, cut in half and toasted (optional)

Mango chutney, to serve

Micro Salad leaves or Mixed salad leaves (chopped), to serve


Method: 

In a bowl, mix together the chicken mince and the remaining patty ingredients. Mix well, then shape into 12 small patties. Line a baking tray with baking paper, cling wrap or foil, and place patties on to the tray. Loosely cover, and chill in the fridge for half an hour. 

While the patties are in the fridge, prepare the curry mayonnaise by adding all the mayonnaise ingredients in a small bowl and mixing together. Set aside in the fridge until needed. 

Heat olive oil in a frypan over medium-high heat. Cook the patties 2 or 3 at a time (depending on the size of your pan) for 2-3 minutes per side or until cooked through. 

To serve, spread some mango chutney over the base of each bun and top with a chicken patty. Drizzle some of the curry mayonnaise over the patty and top with extra coriander, salad leaves then the remaining half of the bun. 

Use a skewer or toothpick to secure the bun together if needed. 

Recipe originally from ‘ABC Delicious Home Cooking’ by Valli Little (HarperCollins, 2012) p.14.

All baking, styling and photography for this post by Kathryn Vincent of Kulinary Adventures of Kath.

In Savoury Dishes/Meals Tags Chicken, Sliders, Valli Little, ABC Delicious, Home Cooking, Dinner
Comment

Roasted Salmon with Asparagus & Pancetta

Kath February 28, 2015

This past week I have been searching through many of the cookbooks in our collection, trying to decide and plan what recipes I will make for my cookbook challenge. I have decided to do a few savoury recipes, which as you might have noticed, I don’t post a lot of on here. 

However, in an attempt to make an effort for dinner (at least on the weekends), I am using my cookbook challenge to try something new for dinner. Granted, some of the recipes I plan to make aren’t exactly ‘new’. They are just ‘new’ for the blog. But not only is the concept of trying something completely new every weekend a little daunting, some of the recipes we have tried before a just too good not to share here. 

This salmon recipe falls into that category. It’s from Bill Granger’s book ‘Bill’s Italian Food’, and it literally takes 10-15 minutes to cook. Which is pretty amazing I think. All the ingredients are easy to come by, and in our house are pretty much always already in the pantry/fridge/freezer. The salmon fillets I used are probably smaller than the ones specified in the recipe, however we tend to buy frozen salmon and keep it for these kinds of quick meals, and we find they are the perfect size (expect sometimes for the men of the house who often eat two fillets each). 

Roasted Salmon, Asparagus and Pancetta with Caper & Basil Mayo 

Ingredients:

1 tbsp capers, drained

8 basil leaves, chopped

juice of 1/2 lemon, plus extra wedges to serve

4 tbsp mayonnaise

4 salmon fillets, skin on (approx. 175g each)

250 g asparagus

8 slices pancetta

2 tbsp olive oil

salt and pepper, to season 


Method: 

Pre-heat oven to 220 degrees Celsius. Mix the capers, lemon juice, mayonnaise and basil in a small bowl. Set aside. 

In a large roasting pan, place the asparagus, pancetta and salmon (skin side up). Season with salt and pepper, drizzle with the olive oil, and cook for 10 minutes, or until the salmon is cooked through (or to your liking) and the pancetta is crisp. 

Serve with the mayonnaise and wedges of lemon. 

Original recipe from ‘Bill’s Italian Food’ by Bill Granger, (HarperCollins, 2013), p.106.

All food preparation, styling and photography by Kathryn Vincent of Kulinary Adventures of Kath.

In Savoury Dishes/Meals Tags Salmon, Bill Granger, cookbook challenge, Dinner, Quick Meals
Comment
  • The Blog
  • Older
  • Newer

recipes

  • Biscuits/Cookies 39
  • Breads Etc. 9
  • Breakfast 7
  • Cakes & Slices 68
  • Confectionary 5
  • Drinks 6
  • Events 14
  • Food Photography Tips 3
  • From The Mailing List 24
  • Heirloom Recipes 12
  • Holidays 44
  • Ice Cream 9
  • Jams Preserves & Spreads 9
  • Muffins 4
  • Off the Shelf 48
  • Other Desserts 25
  • Savoury Dishes/Meals 15
  • Scones 4
  • Tarts & Pastry 9
  • Travel 13

Sign up to Friday Food Chat with Kath, a weekly newsletter for more food, baking, cookbook chat and more!

Sign Up Here!
instagram-unauth pinterest facebook url

Website Accessibility: To enable text to speech function on the blog, click the sound button to the right of each blog post.

All images & content are the property of Kathryn Vincent, unless stated otherwise. Please do not use without permission.

Kulinary Adventures of Kath

Food Photography, Recipes & Baking

instagram-unauth pinterest facebook url