Kulinary Adventures of Kath

Food Photography, Recipes & Baking
  • home
  • About
  • Work with Kath
  • Shop
  • Blog
    • The Blog
    • Recipe Archive
  • Newsletter
  • Contact
  • home
  • About
  • Work with Kath
  • Shop
    • The Blog
    • Recipe Archive
  • Newsletter
  • Contact
Raspberry Pistachio Rose Cake (23 of 25).jpg

The Blog

Recipes and Food Photography by Kath Vincent.

  • The Blog
  • Recipe Archive
  • All
  • Biscuits/Cookies
  • Breads Etc.
  • Breakfast
  • Cakes & Slices
  • Confectionary
  • Drinks
  • Events
  • Food Photography Tips
  • From The Mailing List
  • Heirloom Recipes
  • Holidays
  • Ice Cream
  • Jams Preserves & Spreads
  • Muffins
  • Off the Shelf
  • Other Desserts
  • Savoury Dishes/Meals
  • Scones
  • Tarts & Pastry
  • Travel
Hot Cross Bun Loaf

Hot Cross Bun Inspired Loaf

Kath March 30, 2023

I like hot cross buns, however they are quite fiddly to make. My least favourite parts of the process are rolling the dough into balls, and piping the cross over. I find the only way to get relatively even sized hot cross buns is to weigh the dough and divide by how many I am making (usually 12). Then rather painstakingly weight out the dough until each ball is about the same weight. I just find it annoying!

Even though the cross on the hot cross buns is quite easy, I do find so many elements can change the look of the cross. How thick has the mixture become (what was the temperature of the water added?), what size hole did I cut in the piping bag? I find I often get varying results even when I’ve made them time and time again. The cross also adds nothing flavour wise so I began wondering why I even bothered with it at all (I understand the point of it re religion, but for me hot cross buns are more about flavour).

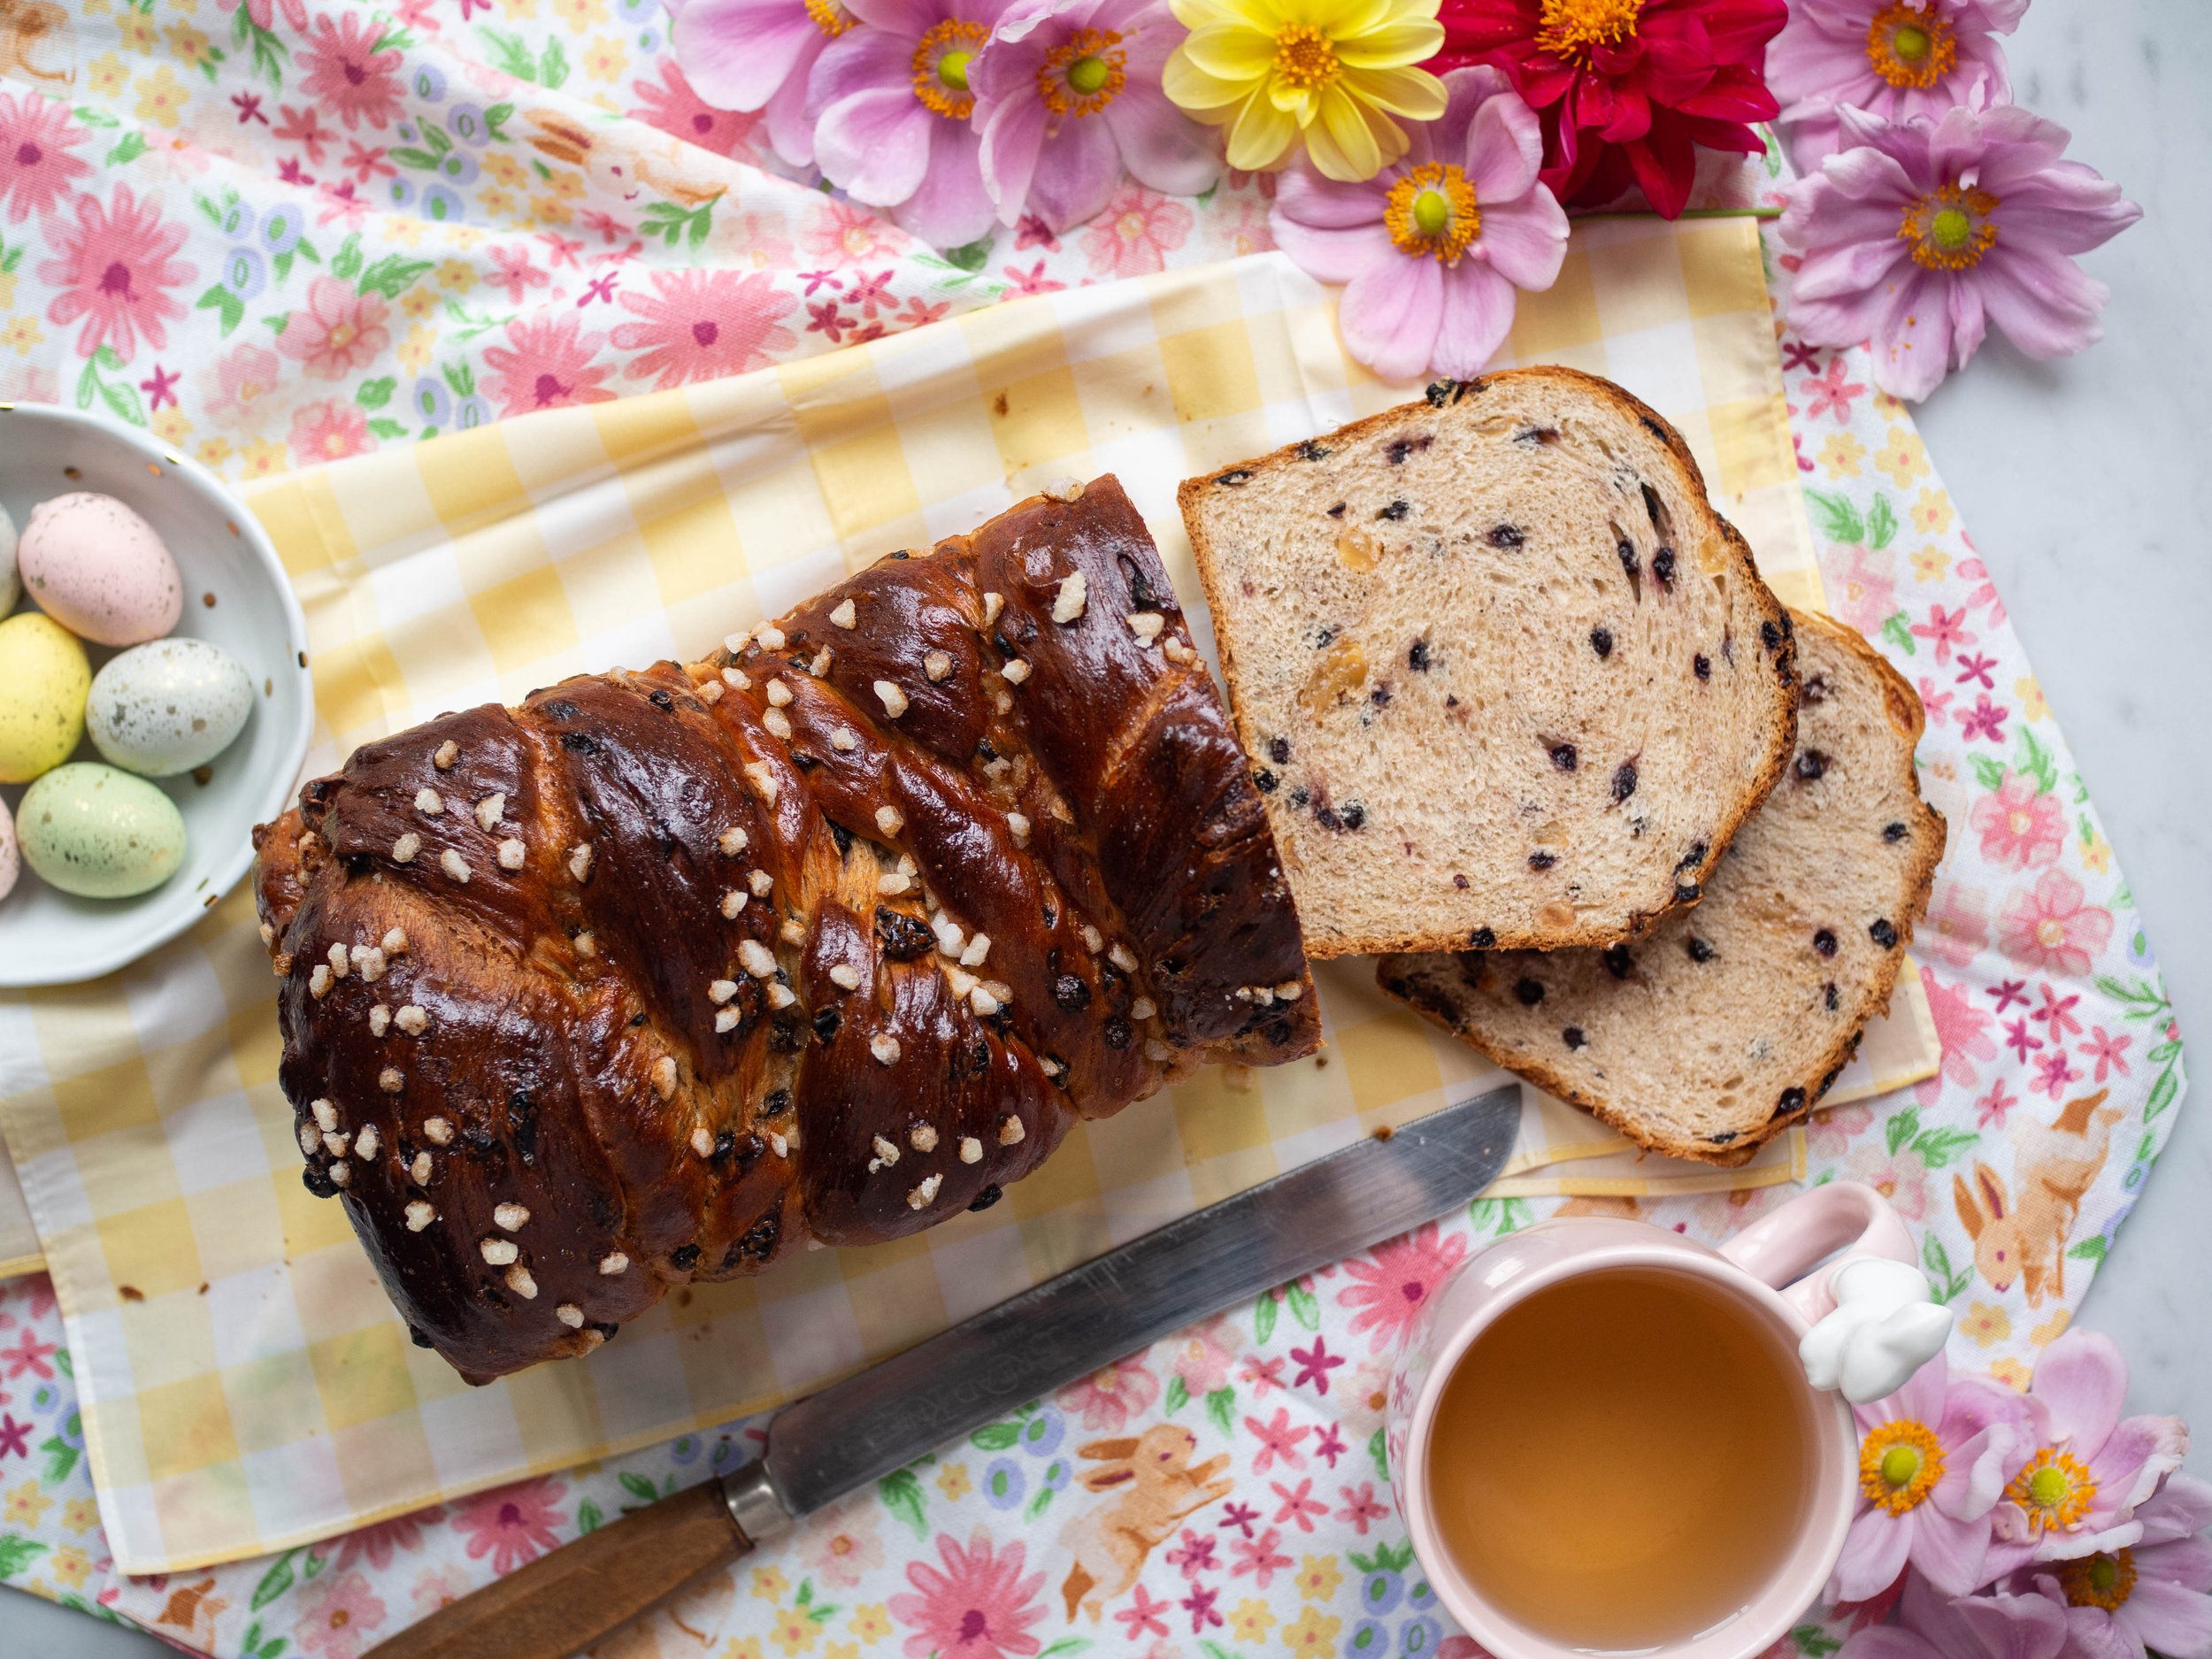
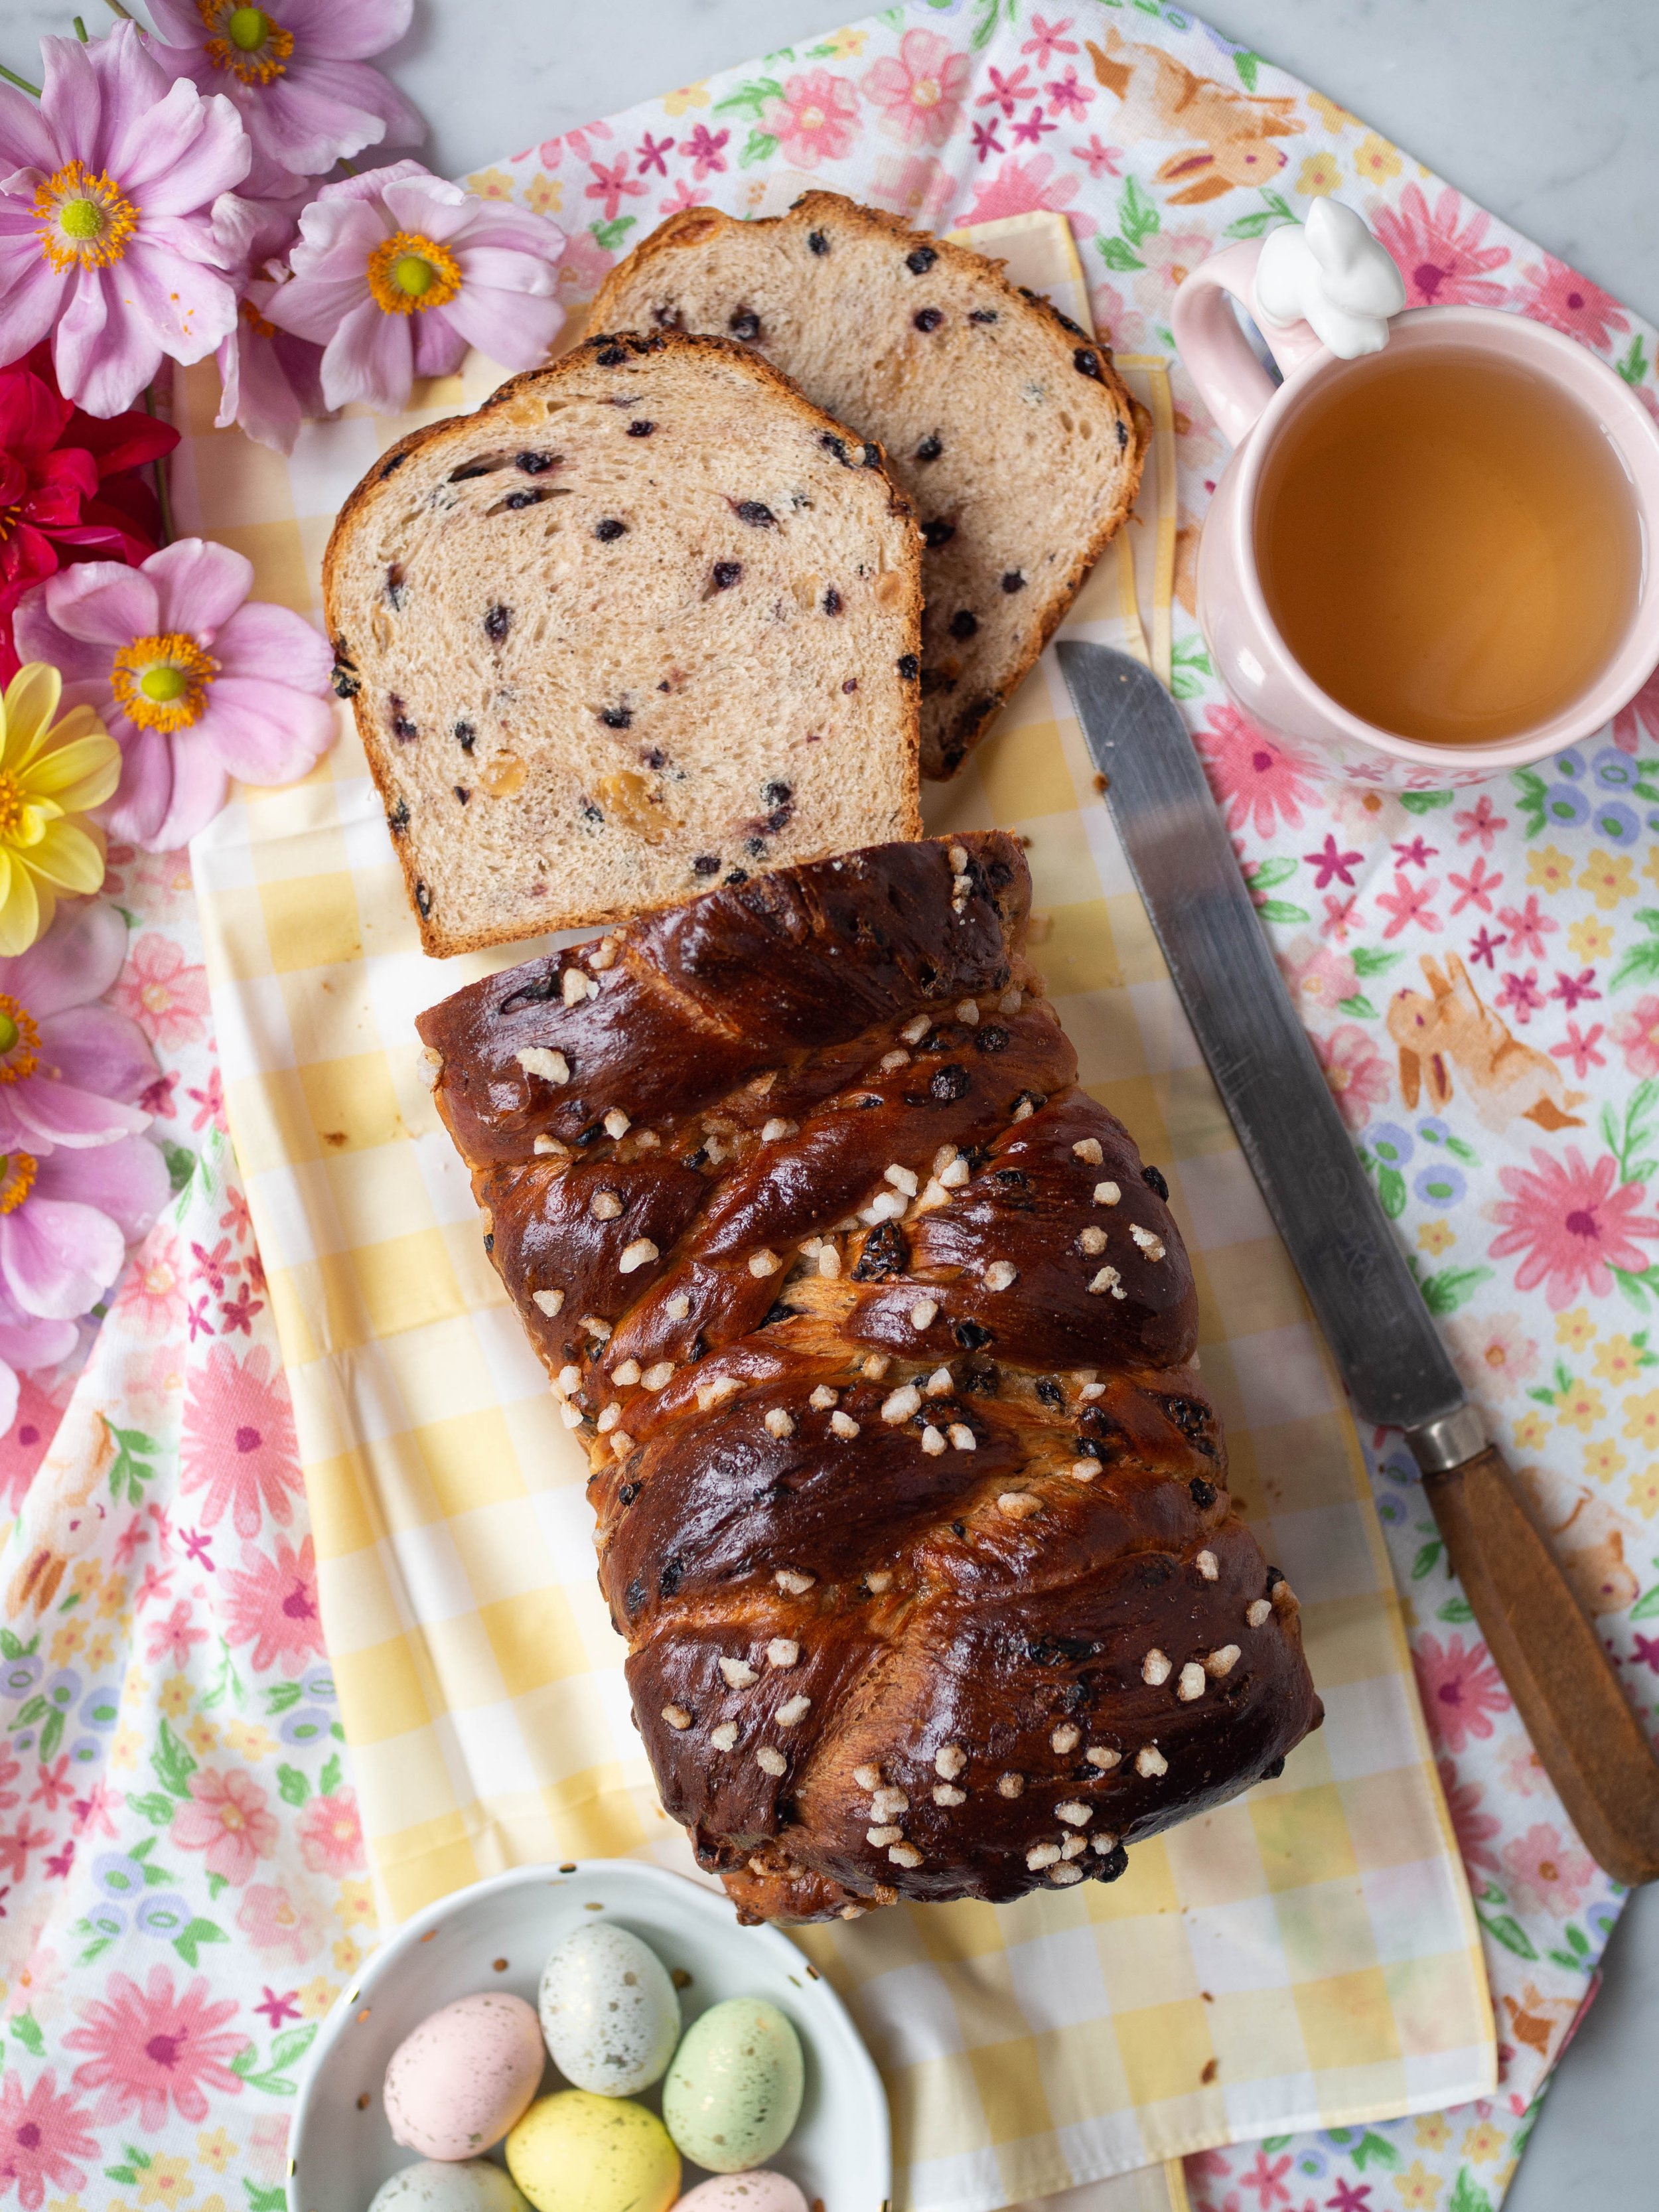
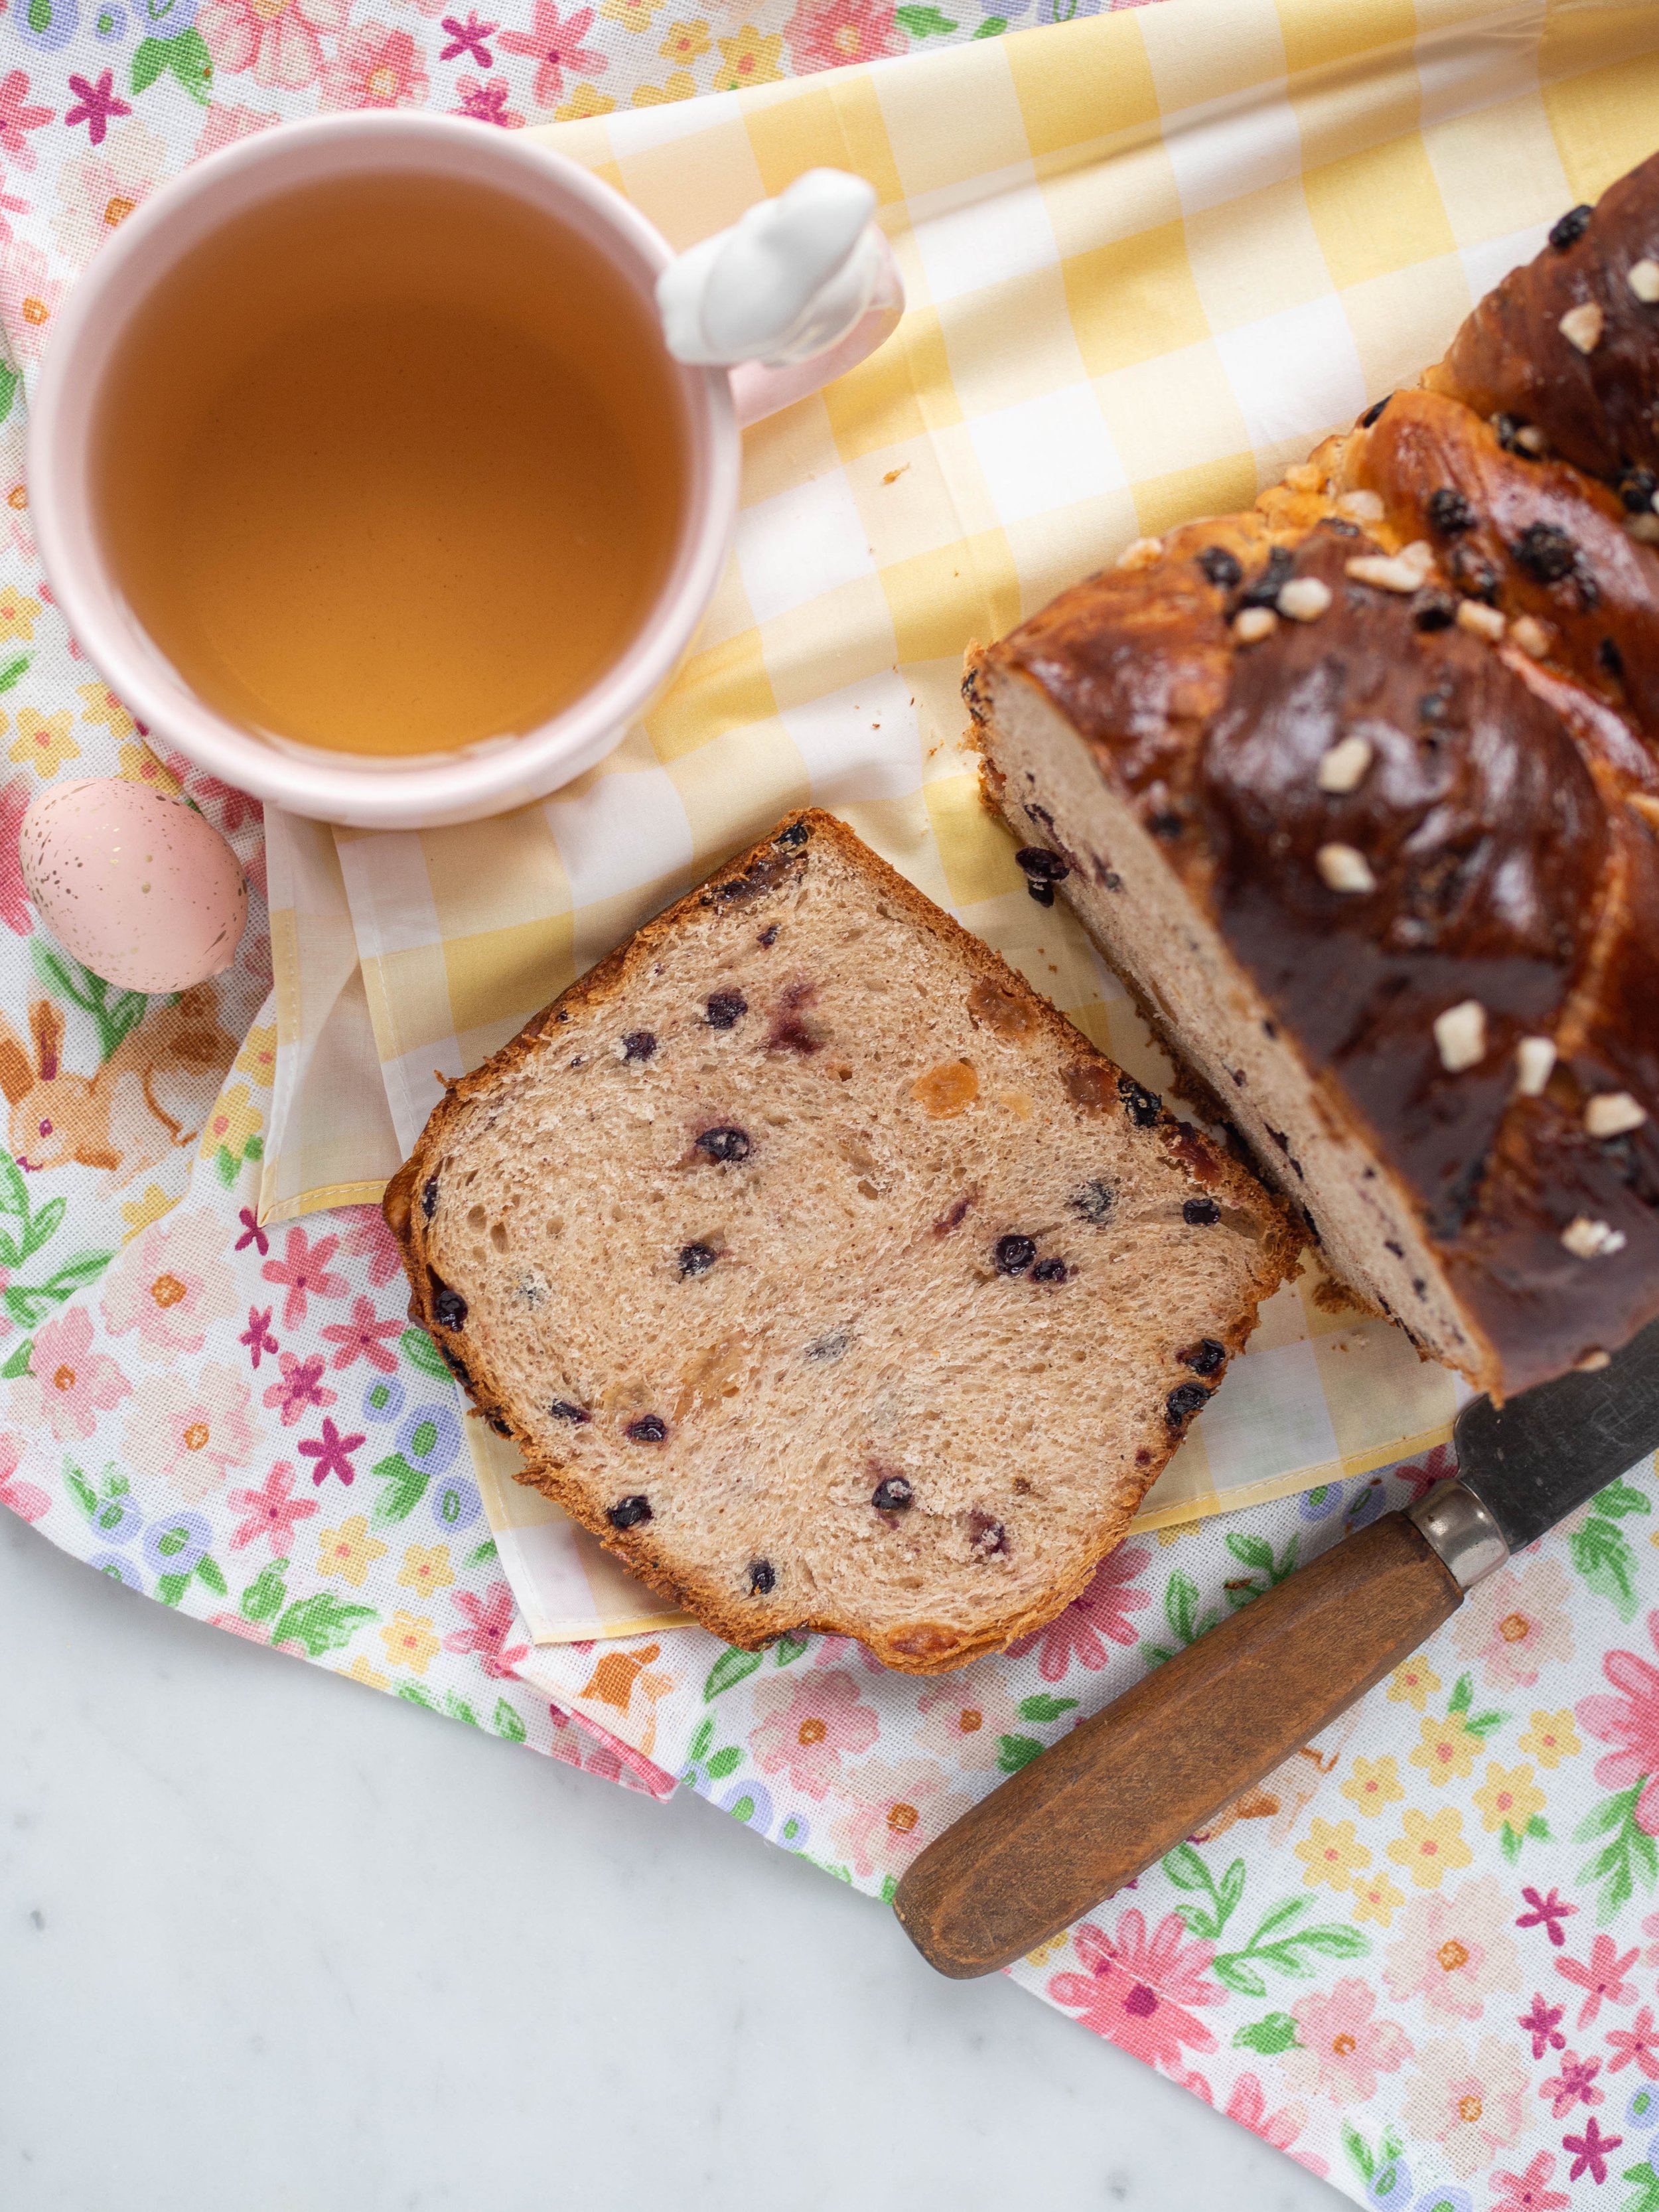
This year I decided to make a hot cross bun loaf, which cancelled out a couple of the steps I dislike about making hot cross buns. I have also found the cut up loaf fits much nicer in the freezer, and toasting it in the toaster is much easier than getting the grill going, and having to defrost the buns before that. 

You could of course still pipe a cross over the top before baking, however I chose to sprinkle the loaf with some pear sugar which holds its shape whilst in the oven.

Obviously making anything yeasted and bread based is going to take some time, but if I can cut out a few of the less necessary slightly annoying steps I’m happy. I’m also happy if I can just get my hot cross bun fix around Easter, and for me, they don’t need to be actual buns. 

This recipe is very much based on the vanilla hot cross buns I made a few years ago, so they are decidedly uncitrus-y which is how I like them. You could add mixed peel, or orange zest if you like.

Hot Cross Bun Loaf
Hot Cross Bun Loaf

Hot Cross Bun Inspired Loaf

Ingredients: 

100g golden sultanas or raisins (roughly copped if very large)

100g currants

2 tbsp vanilla extract

250ml milk

85g (golden) caster sugar

9g dried yeast

490g plain flour, plus extra

2 tsp ground cinnamon

1 tsp ground ginger

1 tsp ground cardamom

1/2 tsp ground nutmeg

1/2 tsp mixed spice

3/4 tsp salt

2 eggs

63ml canola, vegetable or sunflower oil, plus extra

1 tsp vanilla bean paste

cooking spray

Pearl sugar, optional 


Method:

In a small bowl place the sultanas and currants. Top with the vanilla extract, then add enough hot water so the fruit is just covered. Set aside. 

In a small saucepan gently heat the milk and 60g of the sugar. Heat until lukewarm, then remove from the heat and mix in the yeast. Leave for 10-15 minutes, or until the yeast has become foamy - if the yeast does not foam, it may be out of date and no longer active, or if the liquid is too hot it may kill the yeast. It is best to discard the liquid and yeast and begin again if this happens.

Place the flour, salt, spices and remaining sugar into a large bowl (one that fits your stand mixer if you have one), and mix together. 

In a jug, whisk together one of the eggs with the oil and the vanilla extract.

Once the yeast is foamy, add to the flour mixture, along with the egg and oil mixture. Mix together with a wooden spoon until a rough dough forms. 

Then attach the bowl to your stand mixer fitted with the dough hook, and knead on a medium speed for about five minutes. The dough will be smooth and a little sticky once done. If the dough is too sticky, add a little more flour (1-2 tbsp). 

While the dough is kneading, lightly oil a large bowl and drain the sultanas and currants well. 

Dust your work surface with flour and tip the dough out. Add the fruit mixture bit by bit and knead by hand to combine into the dough. Add small amounts of flour if necessary to counterbalance any moisture the soaked fruit has added and to make the dough a bit less sticky - the dough will be a bit sticky to touch, but it shouldn’t be really wet. There is no need to knead the dough for too long, as your stand mixer has done most of the work already. 

Place into the oiled bowl and cover. Leave in a warm spot for 1.5 hours, or until the dough has risen and doubled in size. 

Spray a 22 x 10 x 8.5cm (approx.) loaf tin* with the cooking spray. 

Once the dough has risen, very lightly flour your work surface and tip the dough out. Divide the dough into three, and roll each portion into a long strand (about 10-15cm). 

Plait the strands together, ensuring either end is well connected and tucked under if necessary. If the plait has become quite long push it from either end to reduce it’s size (so it will fit into your tin). Place into the prepared tin, cover and leave in a warm spot for about 30 minutes, or until the dough has risen. 

While the dough is rising, preheat oven to 180 degrees Celsius.

Once the dough has risen, beat the remaining egg to create an egg wash. Brush the loaf over with some of the egg wash. Then scatter over some pearl sugar.

Bake in the oven for 40 minutes. Check after 20 minutes, and loosely place some foil over the top to prevent the loaf from over browning if necessary. 

The loaf will be ready when it is golden on top, and sounds hollow when gently tapped. Remove from the oven, and place on a wire rack. Leave to cool in the tin for about 20 minutes.

Once the loaf has cooled a little, slide a spatula or flat bladed knife around the edges of the loaf to detach the loaf from the tin if it has stuck. Remove from the tin and allow to cool completely before cutting into about 12 slices. 

Serves 12 (approx. - it will depend on how thickly you cut the slices!). 

*a more bread baking style loaf tin rather than a cake loaf tin (which can be smaller) will work better for this recipe. The loaf tin needs to have fairly high sides to accommodate the bread rising in the oven. If you don’t have a loaf tin big enough, once the loaf is braided place on a lined baking tray for the second proof and then use the egg wash and bake as per the recipe instructions.

Hot Cross Bun Loaf
Hot Cross Bun Loaf
In Breads Etc., Holidays Tags Hot Cross Buns, Hot Cross Bun Loaf, Easter, Breads, Holiday Baking
Comment
Biscoff Hamantaschen

Biscoff Hamantaschen

Kath March 6, 2023

I had this recipe in mind to make at Purim a couple of years ago, and for some reason didn’t get around to it until this year. I originally shared this recipe (if I can really call it that, as it’s just an assembly job) over on Instagram as part of my ‘Year of Everyday Bakes’ series.

As I explained in this post, I am sharing a recipe a week that is simple, easy and could fit into your everyday life. I hope it inspires you to bake a little more without adding any stress to your day.

Hamanstachen are small triangle shaped pastries, some are more biscuit like as these are, while there are other varieties that use a yeasted dough. They are traditionally made and eaten during the Jewish holiday of Purim, and while Biscoff hamantaschen are in no way traditional, like I said they are very easy to make and require much less time than making each element from scratch.

This recipe is very low stress as I am asking you to use bought pastry, though homemade would be lovely too, and Biscoff spread. All pre-made, all easy but most importantly all tasty. You can think of these like a little free form individual tarts if you like (maybe an alternative to a jam tart or similar?), a quick and easy baking project with very tasty results

Biscoff Hamantaschen

Biscoff Hamantaschen

Ingredients:

1 sheet shortcrust pastry (approx.435g - I used Careme brand, if you use another brand who make smaller sheets of pastry you made need 2-3 sheets).

1 jar Crunchy Biscoff Spread

1 egg, beaten

Sprinkles, optional


Method:

Line three large baking trays with baking paper.

Leave the pastry on the plastic sheet it comes on, and using a 7.5-8cm round biscuit or scone cutter, cut out rounds of the pastry and place on the prepared trays. Cut out the rounds as close toegtehr as possible, so you have minimal pastry scraps left over.

Re-roll the remaining pastry - you can do this inbetween the plastic sheet the pastry came on so you don’t have to flour your bench or rolling pin - and cut out the remaining pastry.

Brush the beaten egg around the edges of each pastry round (you won’t use all of the egg). Drop teaspoonfuls of the Biscoff spread (no more than 1 tsp per pastry round, you shouldn’t need the whole jar - I used about 3/4 of one jar) into the centre of each pastry round. Then pinch the rounds into triangle shapes, esnure the corners are well sealed. You can brush with more egg if needed. See this post for more detailed instructions on how to fold the hamantaschen* - if you create a smaller hole in the centre and fold your hamantaschen up tigther than what I have done here, it will also help them not break open or spill over in the oven - you can see in the photos some of mine have spilled a little.

Place the trays of hamantaschen in the fridge for at least 30 minutes so the pastry can chill. Do not skip this step - this, along with not overfilling the hamantaschen will help ensure your hamantaschen don’t spill over and loose their shape when baking.

Preheat oven to 180 degrees Celsius.

After at least 30 minutes, remove the trays of hamantaschen from the fridge, sprinkle with sprinkles and bake for 15-20 minutes or until the pastry is golden.

Once removed from the oven you can sprinkle more sprinkles over the hamantaschen for an extra pop of colour. Allow the hamantaschen to cool on their trays.

Hamantaschen will store well in an airtight container for at least 7 days.

Makes about 24 hamantaschen - however this may vary depending on your cutter size and type of pastry used.

*for a great video demonstration of how to fold hamantaschen (plus another great recipe as well as more good hints and tips at making them) check out Lisa Goldberg’s (of the Monday Morning Cooking Club) Walking Up An Appetite YouTube Channel, as she has a great YouTube live video of making hamantaschen that shows how to fold them really well.

Biscoff Hamantaschen
In Tarts & Pastry Tags Hamantaschen, Cheats Hamantaschen, biscoff spread, Purim, Mixer Free Recipes, Holiday Baking, Easy Baking
Comment
cupcake with red wrapper vanilla icing and festive topper

Spiced Christmas Cupcakes with Very Vanilla Buttercream

Kath December 15, 2022

Since I already have quite a few festive recipes on my blog, I decided this year something simple was in order. 

Basic cupcakes like these are great to make when you don’t have time for more complex baking, and they would be a good thing to make with kids as well since the cook time is short (and the decoration options are endless!).

These cupcakes are spiced with the Gewürzhaus Christmas Cake and Pudding Spice which I was gifted in November when I went to visit the new Gewürzhaus store in Sydney’s QVB. It elevates these cupcakes from basic to festive, and provides all the Christmas-y flavour you could need (with very little effort). Other festive spice mixes can be used - a gingerbread style spice mix would also work really well, or a combination of spices such as cinnamon, mixed spice and nutmeg.

The vanilla buttercream is a favourite of mine and has a great vanilla flavour thanks to both vanilla extract and paste. The recipe makes a generous amount so you will have a decent amount of icing on each cupcake, ready to decorate whichever way you please.

Gewurzhaus Christmas cake and pudding spice with cupcake
Spiced Christmas Cupcakes with festive toppers

Spiced Christmas Cupcakes with Very Vanilla Buttercream

Ingredients: 

125g unsalted butter, at room temp

95g caster sugar 

70g vanilla bean sugar

1 tsp vanilla extract

2 eggs 

250g self raising flour

3 tsp Gewürzhaus Christmas Cake and Pudding Spice*

105ml buttermilk

Ingredients for Vanilla Buttercream: 

200g unsalted butter, at room temp 

1 tsp vanilla extract

1 tsp vanilla bean paste

240g icing sugar, sifted

festive sprinkles, to decorate (optional)

festive cupcake toppers, to decorate (optional)

Method: 

Pre-heat oven to 160 degrees Celsius, and line a 12 hole cupcake tray with cupcake cases. 

In the bowl of an electric mixer, beat the butter, sugars and vanilla until light and fluffy.

Beat in the eggs one at a time and mix well. 

Then add half the flour and mix on low speed until combined. Add the milk and mix on low speed until combined. Then add the remaining flour and Christmas Cake and Pudding Spice and gently mix until everything is combined and there are no lumps.

Spoon the mixture evenly amongst the cupcake cases, filling so the cases are about 3/4 full.

Bake for 20 minutes, or until a skewer comes out clean and the cakes spring back to the touch. Remove the cupcakes from the tray and allow to cool on a wire rack.

To make the icing, beat the butter and vanillas in a stand mixer with the paddle attachment for at least 1 minute, or until the butter is light and fluffy. Add the icing sugar and beat for a further minute or two, or until the icing sugar is well combined and the icing is light and fluffy. 

Spread or pipe icing onto the top of each cupcake, and decorate as desired.

Makes 12 cupcakes, will keep for a few days in an airtight container.

*This spice mix is a mixture of cassia, coriander, ginger, clove, nutmeg, so a similar mix of spices could be used in its place. 

Gewürzhaus Christmas Cake and Pudding Spice was gifted by Gewürzhaus.

Spiced Christmas Cupcakes with cup of tea
spiced Christmas cupcakes cut open with cup of tea
In Cakes & Slices, Holidays Tags Cupcakes, Christmas, Gewurzhaus, Christmas Cake and Pudding Spice, cake, Holiday Baking
Comment
Christmas Fruit Slice with Festive Sprinkles

Easy Christmas Fruit Slice

Kath December 16, 2021

I created this slice because I had wanted to try and make a fruit cake this year, but every time I thought about it just seemed like sooooo much effort. 

So I made a slice instead and it was considerably quicker and easier to make, and still has some of the Christmas fruit cake elements. I used my favourite dried fruit from Singing Magpie Produce, and a decent amount of vanilla extract as the ‘alcohol’ element. You could add a little more dried fruit and nuts to this recipe if you wanted it a bit more fruit heavy (say 300g fruit, and 2 tbsp each of the nuts). You could also add some festive spices to the mix as well if you felt like it.

You don’t have to decorate the slice with any festive sprinkles, I just had some so I thought I would use them. Otherwise it’s a nice, slightly crumbly slice, perfect with a cup of tea and none of the end of year fuss I imagine making a traditional fruit cake comes with. This slice is also a great one to make a day or so in advance as the flavour gets even better after the day of baking.

Christmas Fruit Slice with Festive Sprinkles

Easy Christmas Fruit Slice

Ingredients:

120g unsalted butter

250g brown sugar 

1 tbsp vanilla extract

2 eggs, beaten

340g self raising flour 

240g mixed dried fruit, chopped if in large pieces

1 tbsp slivered almonds

1 tbsp slivered pistachios 

Icing: 

50g icing mixture/sugar

2 tsp lemon juice 

Festive sprinkles, optional

Method: 

Preheat oven to 160 degrees Celsius, and line a 30 x 20 cm slice/lamington tin.

In a small saucepan add the butter, brown sugar and vanilla. Heat over low/medium heat and stir until the butter and sugar have melted together. 

Tip the butter mixture into a large bowl, and allow to cool down if it’s quite hot. Mix in the egg and make sure it is well combined. Then add the flour and mix until almost combined. Then the dried fruit and nuts and mix until everything is combined and there are no lumps of flour.

Tip the mixture into the prepared tin and using a spatula evenly spread the mixture out. Bake for 35 minutes or until the slice is a nice golden colour and the centre of the slice doesn’t wobble.

Allow the slice to cool in it’s tin for a few minutes, then remove from the tin and place on a wire rack to cool completely. 

Once cooled make the icing by mixing the icing mixture/sugar together with the lemon juice, and using a spoon drizzle evenly over the slice. Before the icing dries, decorate with some festive sprinkles, sticking them where the icing is (optional). 

Once the icing has had a little time to set, cut the slice in to about 15 pieces.

Serves 15, store in an airtight container, will keep for about 5 days. 

Christmas Fruit Slice with Festive Sprinkles
White and Gold Gingerbread Man Plate
In Holidays, Cakes & Slices Tags Dried Fruit, Christmas, Easy Baking, Mixer Free Recipes, Holiday Baking
Comment
Carrot Cake with Biscoff Buttercream

Carrot Cake with Biscoff Buttercream for Easter

Kath April 2, 2021

Yes, I know. Again with the Biscoff Spread!

Since discovering this caramelised biscuit spread, I have had many ideas for what I could do with it, apart from just using it as a spread. Adding it to a buttercream was one of them, and I can confirm it is delicious!

Since I don’t eat chocolate, I always need to think of something a little different to enjoy at Easter. I thought a carrot cake was quite a fitting alternative, especially decorated with a few pastel Easter eggs.

I have used panela sugar in this recipe as I love the caramel flavour it gives, however you can use the same quantity of brown sugar. I have also used some date syrup to add a little deeper flavour and colour to the cake, but if you don’t have any it can be substituted for more honey.

I hope you have a lovely long weekend, and get to enjoy a slice of cake, Easter egg or hot cross bun - or even better get to spend some time in the kitchen and bake some for yourself!

Carrot Cake with Biscoff Buttercream
Easter Picnic

Carrot Cake with Biscoff Buttercream

Ingredients: 

110g panela sugar (or light/dark brown sugar) 

185ml canola/vegetable oil 

85ml date syrup

100ml honey

4 eggs 

1.5 tsp vanilla bean paste 

335g plain flour

3 tsp baking powder

1.5 tsp bicarb soda 

2 tsp Hot Cross Bun spice*

4 large carrots, grated

Ingredients for the Buttercream: 

150g unsalted butter, at room temp

190g icing mixture/sugar 

130g (approx. 1/2 cup) smooth Biscoff spread

pastel Easter eggs, optional

edible flowers, optional

Method: 

Preheat oven to 170 degrees Celsius and line two 20 cm round springform baking tins with baking paper. 

In a large bowl whisk together the sugar, oil, date syrup, honey, eggs and vanilla.

Then add the flour, baking powder and Hot Cross Bun Spice. Sift in the bicarb soda and whisk together until combined.

Then add the grated carrots to the cake mixture and mix to combine. 

Equally divide the batter between the two prepared tins and bake for about 35-40 minutes, or until each cake is springy to the touch and a skewer inserted in the centre comes out clean.

Leave the cakes the cool on a wire rack for about 30 minutes, then remove from the tin and leave to cool completely. 

To make the icing, beat the butter using a stand mixer and the whisk or paddle attachment for 1-2 minutes, or until it is pale and creamy (if your butter is still a bit cold, you will need to beat it a bit longer than this). Add in the icing sugar, and beat for another 1-2 minutes or until the icing is fluffy.

Add the Biscoff spread and beat until combined.

Place one of the cakes on a plate or cake stand, and spread half the buttercream over the top. Top with the second cake, and spread over the remaining buttercream. Decorate with pastel Easter eggs and edible flowers if you wish.

Serves about 8.

*I have used the Hot Cross Bun Spice from Gewurzhaus, as they kindly sent me some. This spice is a combination of cassia, coriander, ginger and clove. You can substitute with your own mixture of these spices or just add 1tsp cinnamon and 1tsp mixed spice.

Carrot Cake with Biscoff Buttercream
In Cakes & Slices, Holidays Tags carrot cake, carrot, biscoff spread, Easter, bicoff buttercream, Holiday Baking, cake
2 Comments
Caramilk Cherry and Pistachio Cookies

Caramilk Dried Cherry and Pistachio Cookies

Kath December 16, 2020

These cookies came about as I have had in my mind for the past year that a dried cherry and pistachio nougat would be an excellent Christmas recipe, but as it always does by this time of the year, time did not allow for a thorough testing of the recipe. 

As it started to become clear that my nougat Christmas dreams weren’t going to come true, I decided my Plan B for a new Christmas recipe would be a cookie with the same flavours. 

Of course, a cookie and nougat are hardly comparable, but what cookies lack in finesse and wide eyed compliments on how much effort you went to, they gain on the fact that they don’t take much effort but are extremely delicious. 

Like the Caramilk Cookies I posted this year on which this recipe is based, these cookies require very little prep, and need no time to chill in the fridge. You could make these in about half an hour. Which at this time of year, sounds pretty good to me. 

You can swap the dried cherries (also labelled as sour cherries sometimes) for dried cranberries and you can use any type of chocolate you wish if you don’t have Caramilk - though I do highly recommend Caramilk for baking as it tastes so good and is considerably cheaper to buy than better quality caramelised white chocolates which I personally find can be a bit lost in baking (save those ones for snacking!). 

So if you have unexpected guests this festive season, or want to drop off homemade goodies if you are socially isolating still, these cookies will have your back and won’t eat up all your time!

Caramilk Cherry and Pistachio Cookies

Caramilk Dried Cherry and Pistachio Cookies

Ingredients:

120ml canola oil

225g caster sugar 

2 tbsp golden syrup

1 tsp vanilla bean paste

1 egg, beaten

290g self raising flour

120g Cadbury Caramilk, roughly chopped

120g dried cherries, roughly chopped

1-2 tbsp slivered or roughly chopped pistachios

Method:

Preheat oven to 170 degrees Celsius and line three large baking trays with baking paper.

In a large bowl whisk together the oil, sugar, golden syrup, vanilla and egg.

Then add the flour and the chopped Caramilk and cherries, and mix to combine with a wooden spoon.

Roll heaped teaspoonfuls of the dough into balls and place on the trays. The cookies will spread as they bake so leave enough room in between. 

Sprinkle the tops of each cookie with some of the pistachio, pressing it in gently so they don’t fall off. 

Bake for 12-15 minutes or until golden brown. Rotate the trays in the oven about halfway through to ensure the cookies cook evenly.  

Allow to cool on their trays, then store in an airtight container (they will last 5-7 days). 

Makes about 30 cookies.

Caramilk Cherry and Pistachio Cookies
In Biscuits/Cookies, Holidays Tags Caramilk, Dried Cherry, Pistachio, Christmas, Cookies, Biscuits/Cookies, Easy Baking, Mixer Free Recipes, Holiday Baking
Comment
  • The Blog
  • Older
  • Newer

recipes

  • Biscuits/Cookies 39
  • Breads Etc. 9
  • Breakfast 7
  • Cakes & Slices 67
  • Confectionary 5
  • Drinks 6
  • Events 14
  • Food Photography Tips 3
  • From The Mailing List 24
  • Heirloom Recipes 12
  • Holidays 44
  • Ice Cream 9
  • Jams Preserves & Spreads 9
  • Muffins 4
  • Off the Shelf 46
  • Other Desserts 25
  • Savoury Dishes/Meals 15
  • Scones 4
  • Tarts & Pastry 9
  • Travel 13

Sign up to Friday Food Chat with Kath, a weekly newsletter for more food, baking, cookbook chat and more!

Sign Up Here!
instagram-unauth pinterest facebook url

Website Accessibility: To enable text to speech function on the blog, click the sound button to the right of each blog post.

All images & content are the property of Kathryn Vincent, unless stated otherwise. Please do not use without permission.

Kulinary Adventures of Kath

Food Photography, Recipes & Baking

instagram-unauth pinterest facebook url